Question:
How do I create a Nixle group?
Can I create a specific group of recipients to send messages to?
Answer:
| NOTE: |
|---|
|
Groups can only be created on the Nixle Engage and the Nixle 360 platforms.
|
Creating and organizing groups is an effective way to easily target contacts when sending messages. Groups can also contain subgroups, which are perfect for managing subset distribution lists specific to each group. Each group can have three subgroups.
To create a group, follow these steps:

- Log in to the agency at agency.nixle.com
- Choose Groups from the menu bar
- Choose the desired type of group to create by clicking either Public Groups or Private Groups from the sub-menu bar
- Choose Create New Group from the right-hand side
|
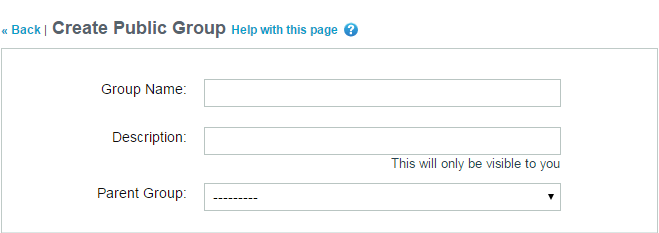
- Enter the Group Name
- Enter the group Description - this is an optional step, is only visible to agency administrators, and provides additional information about the group and its function
- Assign the group a Parent Group to make the new group a subgroup of it; or, leave the field empty to make the new group a parent group.
|
| NOTE: |
|---|
|
If no keyword is set for opting in to a group, contacts must be imported utilizing the importing tool.
|
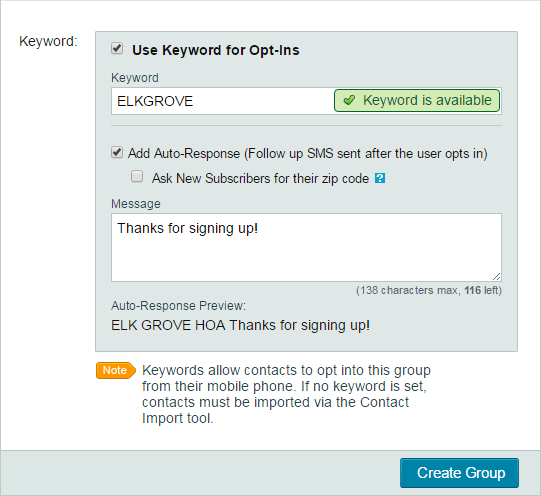
- To allow contacts to join the new group from their mobile phone, check the checkbox next to Use Keyword for Opt-Ins
- Enter the desired Keyword in the text field
- Check the checkbox next to Add Auto-Response and enter the message the contact will receive that confirms their registration
- Check the checkbox next to Ask New Subscribers for their zip code to request contacts' ZIP code location information
- Choose Create Group
|
Comments
0 commentsArticle is closed for comments.