Question:
How do I create a new message using the Nixle Engage or the Nixle 360 platforms?
Answer:
The Nixle Engage and the Nixle 360 platforms share many of the same features for message creation. For an explanation of the Nixle 360 platform-exclusive features, please see the respective section further down.
Nixle Engage Messages
To create a new message on the Nixle Engage platform, follow the steps listed below:
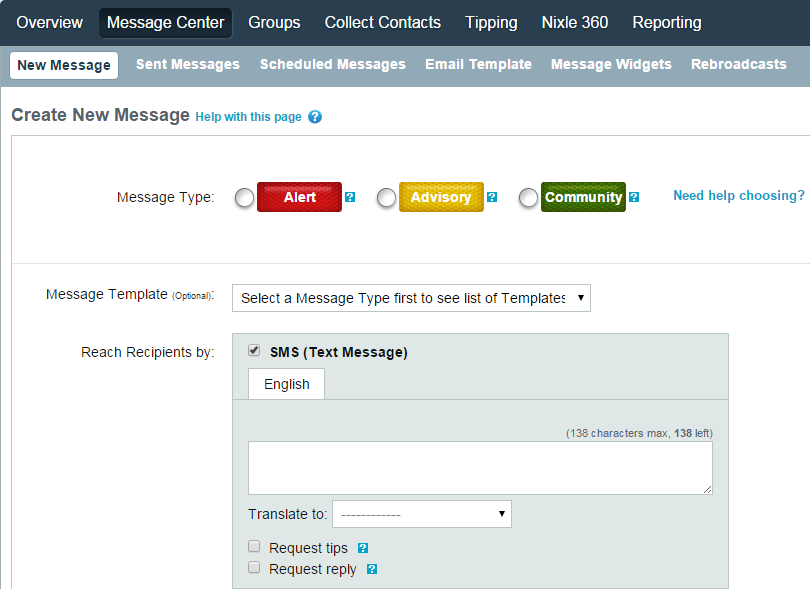
- Log in to the agency at agency.nixle.com
- Choose Message Center from the menu bar
- Choose the Message Type
- To add an optional customizable template for the message, select one from the dropdown menu next to Message Template
- To send a SMS (text) message, check the corresponding checkbox and enter the message.
- To request an anonymous tip, check the checkbox next to Request tips. Tips are available when only public groups are selected.
- To request a reply to the message, check the checkbox next to Request reply. Replies are available when only private groups are selected.
- More information about replies is detailed in the following article: Requesting Replies from Private Groups.
|
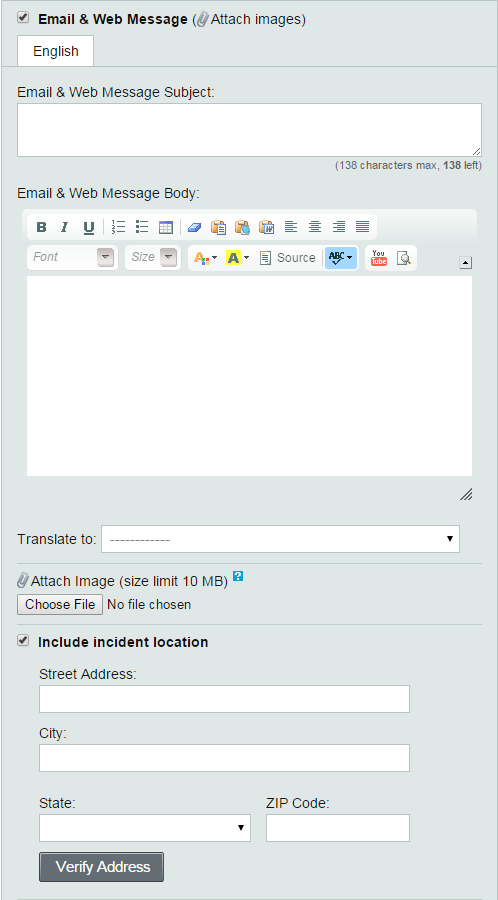
- To include an email and web message with the SMS message, check the checkbox next to Email & Web Message and enter the Message Subject and the Message Body.
- To include an image in the email and web message, select Choose File and browse for the file to attach. Attached files can not exceed 10 MB in size.
- To include an incident location, check the corresponding checkbox next to Include incident location and enter the location information.
- Choose Verify Address to ensure the location information has been entered correctly.
|
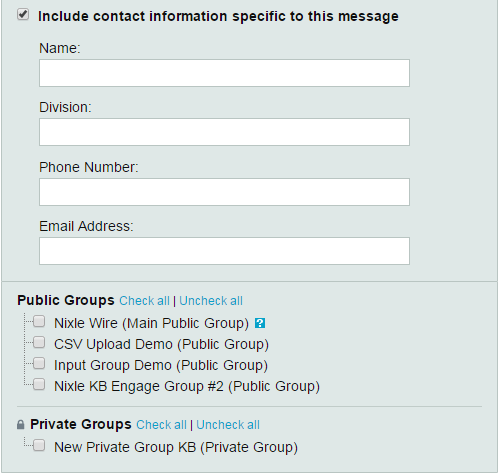
- To include contact information, check the corresponding checkbox next to Include contact information specific to this message and enter the contact information.
- Select the Public Groups or the Private Groups to send the message to by checking the corresponding checkboxes.
|
| NOTE: |
|---|
|
If the message targets both a public and a private group, the web message will be publicly accessible.
|

- Select whether to Send Message Now or Schedule for Future Delivery.
- Schedule the Date of the delivery by clicking
 . .
- Schedule the Time of the delivery by setting the values from the dropdown menus.
- Check the checkbox next to Set Message Expiration to mark the web message as 'Expired' so residents know the alert is no longer occurring.
- Schedule the Date of the expiration by clicking
 . .
- Schedule the Time of the expiration by setting the values from the dropdown menus.
- If there is a Twitter or a Facebook account registered to the agency, can check either or both corresponding checkboxes to publish the message to those social media accounts.
- If the message has any attachments, the first attachment will be included if the message is published to the Facebook account.
- Choose Preview Message to review how the message will appear in the formats selected (SMS, Email & Web Message, or both).
- Choose Edit Message to make any changes to the message.
- If the message appears as desired, choose Send Message. This will immediately publish and distribute the message to the groups selected to receive it.
- Schedule future delivery by choosing Schedule Message.
|
Nixle 360 Messages
A message can be constructed on the Nixle 360 platform by following steps 1 through 15 as outlined for the Nixle Engage platform. The steps below describe how to use the Nixle 360 platform-exclusive features.
Voice Dialing
Voice can be added to the message with the selection of Voice Dialing. Follow these steps to utilize this feature:
| NOTE: |
|---|
- The voice dialing feature is only available for alert type messages.
- Allow the Nixle website access to the computer's microphone to record a message.
|
|
Checking the checkbox next to Voice Dialing displays the voice delivery options.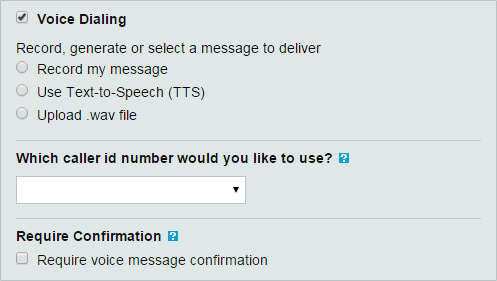
-
Record my message allows dictation of a message of up to five minutes in length through a microphone connected to the computer.
- With a microphone connected to the computer, choose Record and begin dictating the message.
- Choose Recording: click again to stop when completed dictating the message.
- Choose Play to review the message, and Stop to end playback of it.
-
Use Text-to-Speech (TTS) to generate a message of up to 5000 characters from entered text.
- Enter the text of the message in the text field.
- Choose Convert my text to speech.
- Choose the play button to review the message.
-
Upload .wav file to select and attach a pre-recorded message saved as a .wav file on the computer.
- Select Choose File and browse the computer to attach the file.
- The file must meet these requirements:
- It must be less than 15MB in size.
- A sampling rate of 8 kHz is recommended.
- Mono audio is recommended.
- The file format must be WAV.
- The recording duration must be less than five minutes.
After selecting the delivery option to send the voice message with, select the number that will display on the residents' caller ID from the dropdown menu.
To require confirmation from residents that they have received the voice message, check the checkbox next to Require voice message confirmation. Resident's numbers will be redialed under the following conditions:
- Their number is busy.
- They do not answer the call.
- They do not confirm they have received the entire message by pressing 1 at the end of the recording.
|
Geographic Filtering
Residents can be targetted by geographic location in addition to group selection by utilizing one of three geographic filters.
-
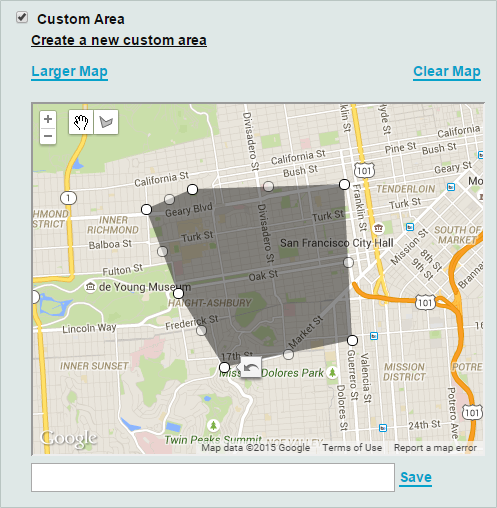
Custom Area allows users to include recipients by setting a custom area defined by a polygon shape. To set a custom area, follow these steps:
- Choose
 from the upper left-hand corner to click and drag the map to the desired location for the custom area. from the upper left-hand corner to click and drag the map to the desired location for the custom area.
- Choose
 from the upper left-hand corner and draw the polygon by clicking around the area to include. from the upper left-hand corner and draw the polygon by clicking around the area to include.
- Thefirst click sets one corner of the polygon, the second click the second corner, and so on.
- The polygon can have as many sides as desired.
- To complete the polygon, connect and click the final created side of the polygon to the first click.
- The polygon will darken when it is completed.
- The polygon can be further stretched once it is completed by clicking and dragging from any of its angles or sides with
 . .
- Undo the last stretch of the polygon by clicking
 . .
- More than one area can be drawn at a time.
- To save the polygon, enter a descriptive name for it in the text field and choose Save.
- Have as many saved custom areas as desired.
- To create a new custom area, the map can not currently display any of the saved custom areas.
- Choose
 to edit a custom area, and to edit a custom area, and  to delete a custom area. to delete a custom area.
- Choose Larger Map to enlarge the map, and Smaller Map to return the map to its original size.
- Choose Clear Map to remove any selected saved areas or in-progress areas from the map.
|
-
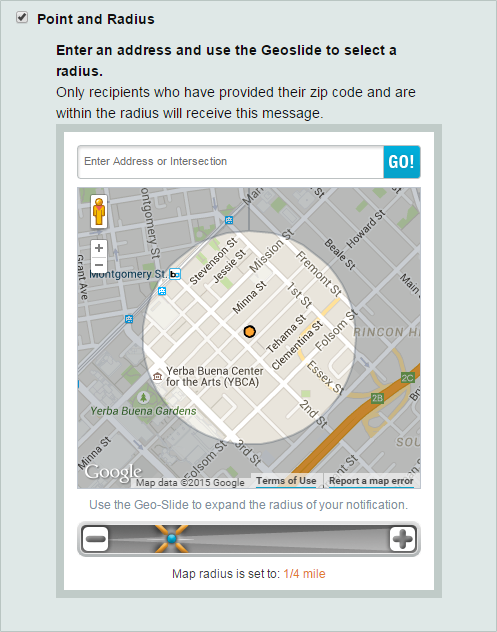
Point and Radius to include recipients by defining a radius from a specified address. To set a point and radius, follow these steps:
- Enter the address that is the focal point for the radius in the text field and choose Go.
- Confirm the address and choose Apply.
- Set the radius of the notification by clicking
 to expand it or to expand it or  to shrink it. Click and drag to shrink it. Click and drag  to expand and shrink the notification radius. to expand and shrink the notification radius.
- The radius has a maximum setting of ten miles.
-
City/Town name or ZIP Code to include recipients by specifying cities, towns, and ZIP codes that are within the agency's jurisdiction. To set cities, towns and ZIP codes, follow these steps:
- Enter a city, town or ZIP code in the text field.
- Choose the desired area from the displayed options.
- Include as many cities, towns and ZIP codes as desired.
- Choose
 to remove a selected area. to remove a selected area.

|
Comments
0 commentsArticle is closed for comments.